The Problem
Most existing vibe-coding guidance assumes text in, text out. You type a prompt, the model writes code, you read the diff, you accept or reject.
That's not where most real-world vibe coding happens in 2026. The dominant mode is UI work driven by screenshots — paste a screen, describe a target, ride the loop. Cursor's vision mode, Claude Code's image paste, ChatGPT with image upload, and the web-based vibe shops (v0, Bolt, Lovable) all centre on this pattern.
The discipline is different from text vibing — and the failure modes are different too. The text playbook does not transfer cleanly.
The Core Insight
Visual vibing is a multi-channel feedback loop, not a prompt loop.
The model needs four channels at once: the prompt, the rendered screenshot, the page's underlying code — including the live structure the browser builds from it, known as the DOM — and the console output. You have to know which channels to send when. Sending the wrong subset is the most common reason a visual vibe session loops.
- Prompt only — fine for greenfield ("build a settings panel"), bad for fixes ("the button looks weird").
- Prompt + screenshot — works for layout / spacing / color matching.
- Prompt + screenshot + console — required when the bug is rendering vs. logic.
- Prompt + screenshot + DOM/source — required when the bug is in component conventions, not layout.
The loop that runs this work
The walkthrough further down is three loops — constrain, diff, apply-and-verify. Run them as written the first few times. The discipline is what transfers between tools; no particular tool is the point.
Once the sequence is muscle memory, collapse it into something you hand over in one line: "Inspect how my project already does styling and tell me what you found before writing anything. Then give me a numbered change list, and flag anything that touches parts other pages share. Then apply only what I approve, and check light and dark before you tell me you're done." That is the whole workflow, and it belongs somewhere your agent reloads it — a skill if yours installs them, otherwise your instructions file.
What never gets delegated is the approval in the middle. The moment you stop reading the change list is the moment the model starts redesigning shared components you never asked it to touch.
The Six Patterns
1. Screenshot → Diff Loop
Paste current state. Paste target state. Ask for a structural diff. Apply. Re-screenshot.
Best for: small UI tweaks, layout fixes, theme matching, "make this match the design."
Tools: Claude Code (paste image), Cursor (vision mode), ChatGPT.
Tactical move: ask for the diff before any code — a structural list of changes you can approve. Cuts wasted code-gen on changes you'd reject.
2. Console + DOM Pair
When something breaks visually, send both the rendered screenshot and the console errors / network tab. Either alone is half the picture.
Best for: blank screens, pages that draw halfway and stop, "it works locally but not in preview."
Failure to avoid: sending only the screenshot of a broken page. The model will guess at CSS when the actual problem is a thrown error in the console.
3. Design-System-Constrained Vibing
Before vibing, pin the design system: the named color, spacing, and type values your project already reuses — known as design tokens — plus theme, typography scale, color palette. AI vibes within those constraints rather than freelancing CSS.
Setup: at session start, mention the relevant files — @tailwind.config.ts, @app/theme.ts, @components/ui/Button.tsx as a reference component.
Failure to avoid: the model invents new color values, new spacing scales, or new component patterns because nobody told it what already exists.
4. Browser Automation Hand-Back
Agent drives a Playwright/Puppeteer session, screenshots its own state, iterates. Removes you from the screenshot loop entirely.
Tools: Playwright MCP server, Anthropic's Computer Use, browser-use (Python). Capability and exact wiring vary by stack — check the relevant tool's current docs.
Best for: "try five variations and show me the best," sweeps that catch a screen you didn't touch quietly breaking — known as visual regression — and long iteration sessions where your role is judge, not photographer.
5. Reference Pattern Match
"Make it look like this." Paste a competitor screenshot or a designer's comp. AI extracts the visible structure and reproduces.
Caveat: the model extracts the pattern, not pixels. Output quality scales sharply with how specific you are about which parts to copy and which to leave alone.
Tactical move: annotate the reference image (in Figma, screenshot tool, whatever) before pasting. Arrows and labels narrow the prompt.
6. Component-Isolation Vibing
Vibe one component at a time in Storybook or an isolated route. Don't let visual edits ride into a whole-app render.
Setup: Storybook, an isolated route like /playground, or a dedicated test page.
Why it matters: when the model edits a shared component while you're vibing one screen, it silently breaks five other screens. Isolation surfaces the change boundary before it ships.
The Six Failure Patterns
1. Looks Perfect, Doesn't Work
Symptom: the page matches the design pixel for pixel — and it only works with a mouse and good eyesight. Keyboard navigation is broken. Text contrast is too low to read (it fails WCAG, the accessibility standard). The invisible name tags screen readers rely on — known as ARIA labels — are missing or wrong.
Why: screenshots only show how a page looks, never how it works. The model optimizes for what it can see.
Fix: include "and verify keyboard navigation, focus states, contrast, and ARIA roles" in the prompt. Have your agent run an accessibility check (axe-core, Lighthouse) after each batch of visual changes.
2. The Specificity Creep
Symptom: the styling gradually accumulates force-it overrides (!important) and ever-longer "this exact element only" rules — each patch has to outrank the last, and the ranking mechanic is called specificity. After ten loops, the stylesheet is unreadable.
Why: the model is conservative — it adds rather than refactors when it can't see the whole stylesheet.
Fix: a CSS-style constraint in CLAUDE.md/AGENTS.md ("never use !important; refactor instead"). Periodic "clean up the CSS you've written this session" prompts.
3. The Framework Mismatch
Symptom: AI writes its styles in one system while your project uses another — a second styling approach bolted onto the one you already have — or names things in conventions the rest of the codebase doesn't follow.
Why: the model defaults to the most common pattern in its training data, not the convention in your repo.
Fix: at session start, mention an existing component as the reference style (@components/ui/Button.tsx — "match this convention").
4. The Bloated-Component Drift
Symptom: the model keeps adding children to one component instead of splitting. After enough loops, you have a 600-line SettingsPage.tsx.
Fix: explicit "split if over 200 lines" rule in your conventions file. Periodic split prompts.
5. The Invisible Visual Regression
Symptom: change A breaks change B silently because you only screenshot one viewport.
Why: the model can only verify what you show it. Mobile, tablet, dark mode, edge cases — if you don't send them, they regress.
Fix: capture "before" screenshots of multiple viewports / states. Diff after.
6. The Dark-Mode Forgotten
Symptom: light-mode prompt-driven changes silently break dark mode (or vice versa).
Fix: include both modes in the screenshot pair. Or pin the constraint: "this page must work in both light and dark; verify both."
Hands-On Walkthrough: A Settings Page in Claude Code
Three loops, escalating from constraint-setting to applied changes. The prompts below are real and runnable — substitute your file paths.
// what this demo verifies
That the discipline (constrain → diff → apply → verify) holds whatever tool you're in. Every prompt below is plain spoken words — your agent finds the right files itself; you never need to know their names.
Loop 1 — Set the constraints
"Look at how my app already does styling — the colors, spacing,
and fonts it reuses, and one component that shows the house style.
Don't write any code yet. Tell me what you found, and ask me before
assuming anything you can't see."
What to expect back: a short list — the color and spacing values it will reuse, the component it will model new work on, and a question or two. If it starts writing code instead, stop it and ask again.
Why this loop: burns one cheap turn to align the model on what your project already has before any code generation. Skipping this is the single biggest source of "second styling system" failures.
Loop 2 — Screenshot diff
# Drag in a screenshot of the page as it is now,
# and one of what you want (a mock, a reference, a sketch).

"Compare these two. Give me a numbered list of what has to change,
in plain words — no code yet. I'll approve the list first.
Flag anything that would touch parts other pages share."
What to expect back: a numbered list in plain words ("move the save button into the header"), each item marked just this page or shared. You approve, skip, or strike items before anything is built.
Why this loop: the plan comes before the code. You catch over-scope ("I was going to redesign the button everywhere") while a change is still one line to strike, not an hour to undo.
Loop 3 — Apply with verification
"Do items 1, 2, and 4 — skip 3. Reuse the styles you found in
step one; if you need a color or spacing the project doesn't
already have, stop and ask me first.

When you're done, tell me in one line what you touched, and whether
anything crossed into parts other pages share."

# Then drag in fresh screenshots of the result —
# light mode and dark mode.

"Compare these against the before screenshots. Did anything
change that we didn't plan?"
What to expect back: a one-line summary of what was touched — and after the fresh screenshots, either "nothing drifted" or a specific callout you can see with your own eyes. Vague reassurance ("looks good!") is not an answer; ask again.
Why this loop: the explicit "stop and ask" turns the model into a constrained executor instead of a creative one. The dark-mode pass at the end catches the forgotten-mode failure.
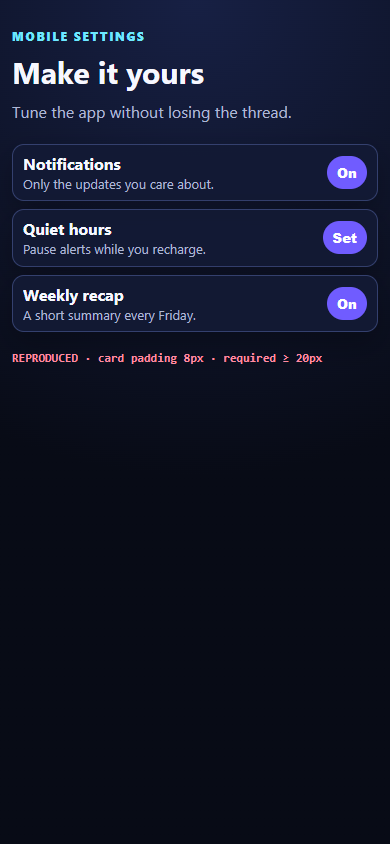
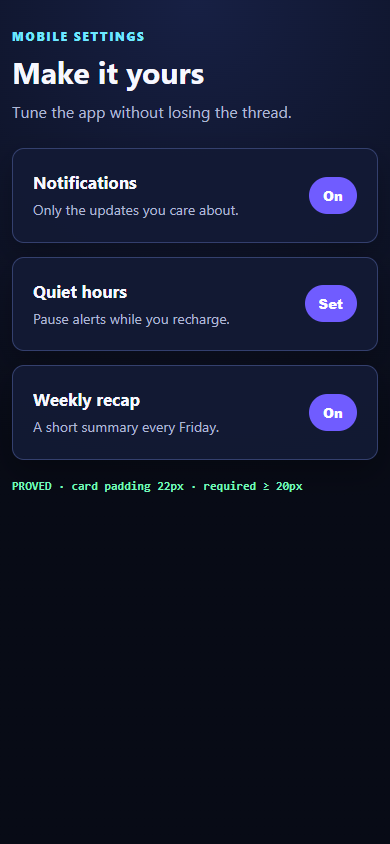
This is what the loop hands back. The complaint was cramped settings cards on mobile; the check failed before the fix and passed after it, under identical conditions:
The Discipline in One Line
Constrain → diff → approve → apply → verify. Visual vibing without these stages produces output you'll spend longer cleaning up than building from scratch.
Anti-Pattern: The "Make It Better" Prompt
Pure aesthetic prompts — "make it look more modern," "make it cleaner," "polish this" — drift unpredictably. There is no objective signal for "modern" or "clean," so the model anchors on whatever's most common in its training data, which usually means: more whitespace, slightly bigger headings, a soft drop shadow.
That might be what you want. More often it isn't, and you can't tell because nothing in the prompt was concrete.
Fix: pin a reference (a screenshot, a competitor, a design token set). Or pin a constraint ("reduce visual noise — remove or merge anything that doesn't carry information").
Cross-Vendor Notes
| Tool | Image Input | Note |
|---|---|---|
| Claude Code | Paste / drag in terminal | Image input is first-class; @filename for code refs. |
| Codex CLI | Capability evolving | Confirm in your version (codex --help); image support has been expanding through late 2025–2026. |
| Cursor | Vision built into the IDE | Designed for screenshot-driven workflows. |
| v0 / Bolt / Lovable | Web upload, prompt + reference image | Whole-app scaffolding, less control over conventions. |
| Anthropic Computer Use | Agent drives a browser | Screenshot loop without you in it; production posture requires sandboxing. |
The Cross-Vendor Gap
Each vendor teaches their own image-and-text workflow well in isolation. Nobody publishes the discipline that survives across them — the prompt patterns, the constraint files, and the verification loops that work whether the visual vibe is happening in Claude Code, Codex, or a web playground.
That's the Vibe Coder Expansion's job, and this article is the visual-mode chapter of it.
Quick Reference
Send all four channels when debugging: prompt + screenshot + DOM/code + console.
Six patterns to keep in your head:
- Screenshot → diff loop (small tweaks)
- Console + DOM pair (broken renders)
- Design-system-constrained vibing (production UI)
- Browser automation hand-back (long iterations)
- Reference pattern match (comps and competitors)
- Component-isolation vibing (shared-component edits)
Six failures to ward off:
- Looks perfect, doesn't work (broken accessibility)
- Specificity creep
- Framework mismatch
- Bloated-component drift
- Invisible visual regression (single viewport)
- Dark-mode forgotten
Rule of Thumb:
Constrain before you generate. Diff before you apply. Verify both modes before you ship.